

Appearance
How to Connect Claude Desktop to WordPress
Connecting Claude Desktop to your WordPress site lets you manage content by simply chatting: draft and publish posts, update pages, organize media and categories, or review comments, all from the Claude app. Easy MCP AI runs the MCP server directly inside WordPress, and Claude Desktop connects to it over OAuth in about two minutes, with no API token to manage.
This guide covers the Claude Desktop app and Claude Cowork; both use the same Connectors screen. If you use Claude in the browser, see How to Connect Claude.ai to WordPress instead.
In this article
Prerequisites
- A WordPress site served over HTTPS with Easy MCP AI installed and activated (see the installation guide).
- Pretty permalinks enabled (Settings > Permalinks set to anything other than "Plain").
- The Claude Desktop app with a signed-in Claude account.
You'll need your site's MCP endpoint URL, which is always your domain followed by /wp-json/easy-mcp-ai/v1/mcp:
https://yoursite.com/wp-json/easy-mcp-ai/v1/mcpYou can copy it from Easy MCP AI > Dashboard in your WordPress admin: click Connect an AI client, choose your client, and copy the URL shown in the Add this site step.
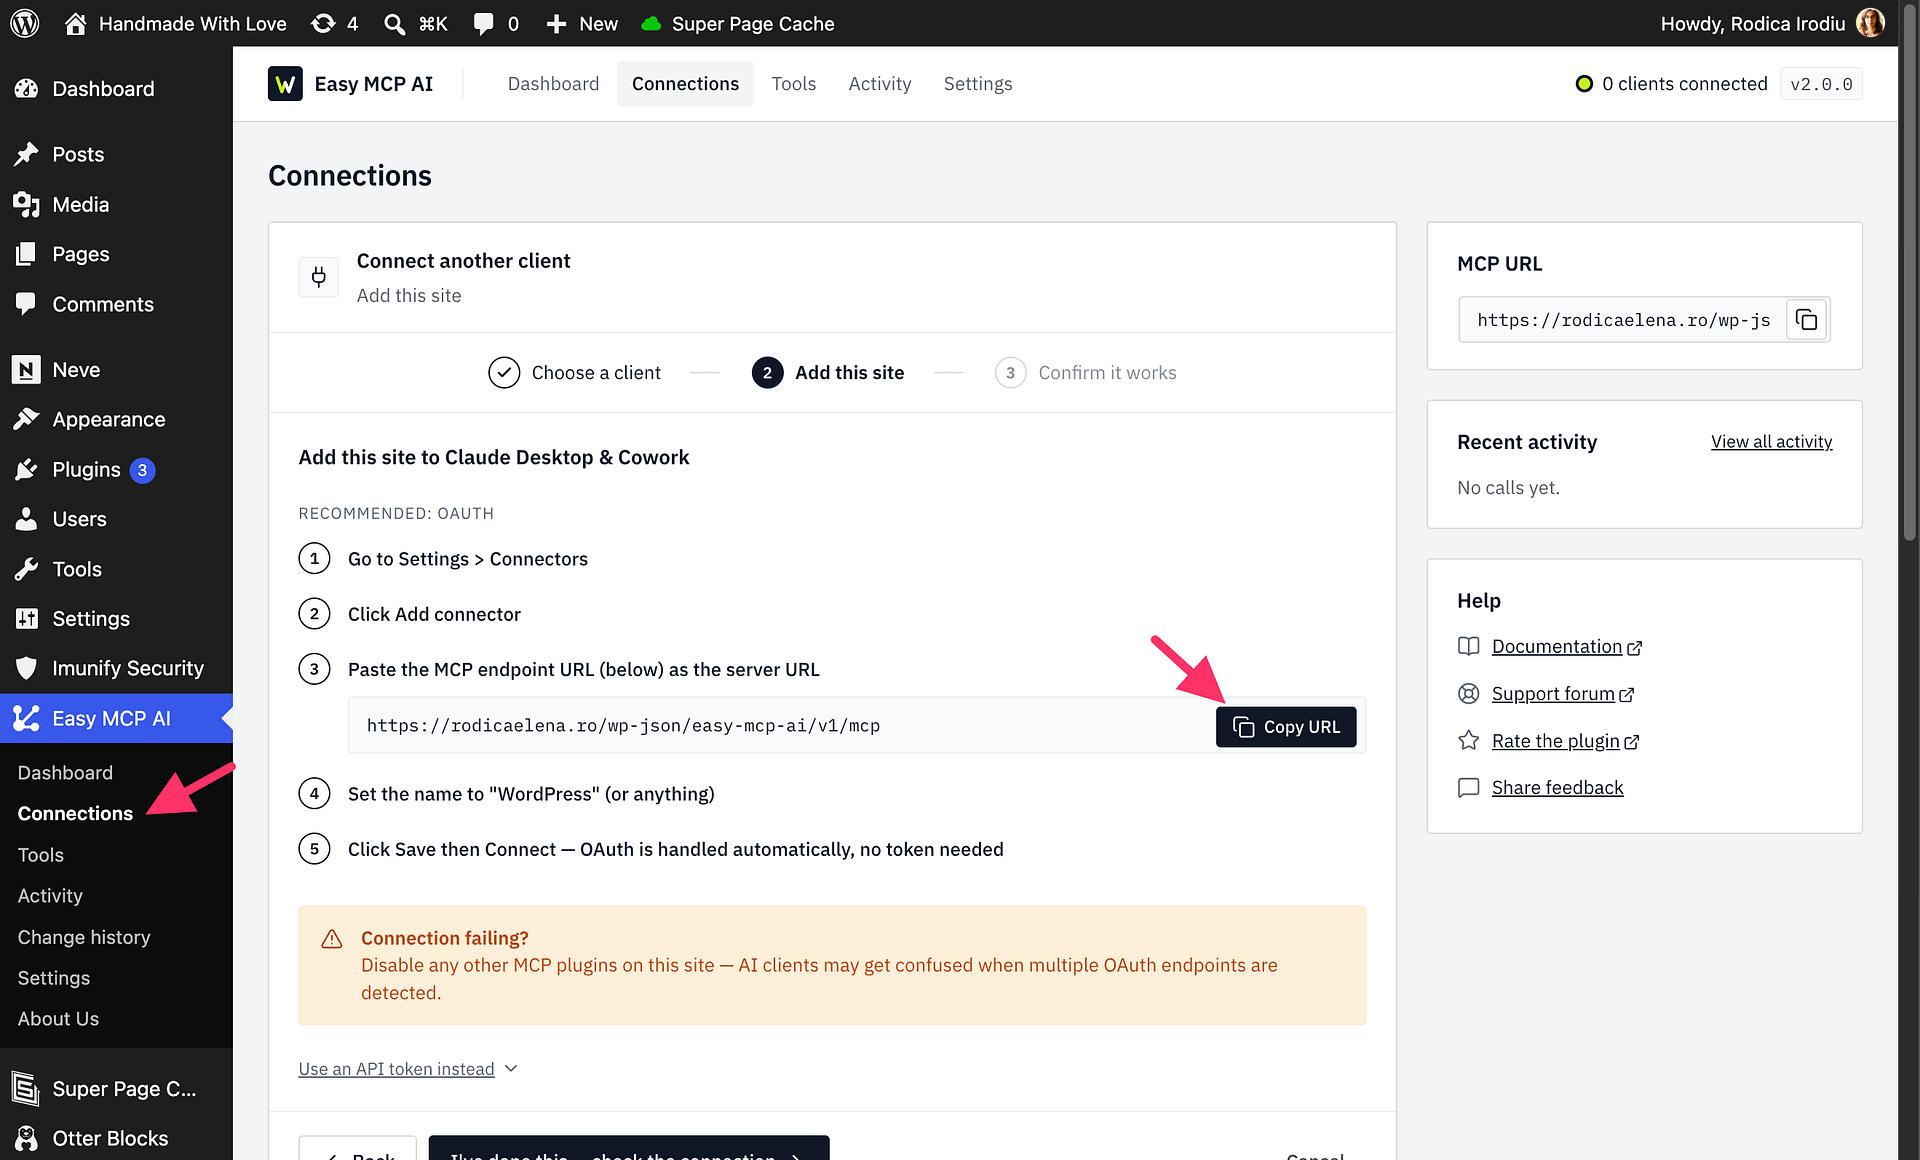
Connect via OAuth (Recommended)
With OAuth, you never handle a token: Claude Desktop discovers the login flow automatically, you approve it once in your browser, and the connection renews itself from then on.
- In Claude Desktop, open Customize > Connectors.
- Click + Add, then Add custom connector.
If you are on a Team or Enterprise plan and the option is missing, an Owner or Primary Owner must first add the custom connector in your organization's settings (on Enterprise, also someone with a custom role that includes Manage access to Libraries).
- Set the name to "WordPress" (or anything you like), paste your MCP endpoint URL as the server URL, and click Continue.
- Keep the sign-in settings Claude detects and click Add.
- Your browser opens a WordPress authorization page. Log in if prompted, choose an access level (Read-only, Full access or Custom), and approve the request.
That's it. You're returned to Claude Desktop with the connector active.
See Managing OAuth Access in Easy MCP AI for access levels, grant management, and what to do after changing your site address.
Verify the Connection
Back on the Easy MCP AI Dashboard, the top of the page shows Connected: 1 OAuth grant (a higher number if you already had other connections). Once your AI client calls a tool, the call appears under Recent activity in the Dashboard sidebar.
Back in Claude Desktop, the connector shows as connected in Customize > Connectors, and the WordPress tools appear in the tools menu of a new chat.
Try a first prompt:
Which are the five most recent posts on my site, and which of them are still drafts?
Claude will ask for permission the first time it uses a WordPress tool, then list your posts.
Alternative: Connect with an API Token
If you prefer explicit credentials, you can configure the connection manually instead of using OAuth. This is useful when you want to give Claude a token limited to read-only tools.
- Create an API token in Easy MCP AI > Connections (API tokens tab) and copy it.
- In Claude Desktop, open Settings > Developer > Edit Config to open
claude_desktop_config.json. - Add the server entry, replacing the URL with your endpoint and
YOUR_API_TOKENwith your token:
json
{
  "mcpServers": {
    "wordpress": {
      "command": "npx",
      "args": [
        "mcp-remote",
        "https://yoursite.com/wp-json/easy-mcp-ai/v1/mcp",
        "--header",
        "Authorization: Bearer YOUR_API_TOKEN"
      ]
    }
  }
}- Save the file and restart Claude Desktop.
The manual method runs the connection through the mcp-remote bridge, which requires Node.js on your computer. Your WordPress server still needs nothing extra; the plugin is pure PHP.
What You Can Do Once Connected
Easy MCP AI exposes your site's capabilities as MCP tools, organized by area: posts, pages, media, comments, categories and tags, menus, custom post types, blocks, revisions, users, plugins, themes, site settings, and search. Integrations such as WooCommerce and SEO data sources are included when available. What Claude can actually touch is always bounded by the connected WordPress user's role and your plugin settings.
Some things to try:
Draft a 600-word post about our new spring collection and save it as a draft.
Find every page that still mentions our old phone number and update it.
Show me the comments awaiting moderation and summarize what they're about.
Control What Claude Can Access
The connection acts as the WordPress user who approved it (or the token's assigned user), so WordPress roles apply as usual. On top of that, you can globally disable sensitive tools such as deletions, user management, and site settings. You can also set rate limits, force AI-created posts to stay drafts, and review every action in the audit log. See Creating and Managing API Tokens for all the guardrails.
Security
If you identify a potential security vulnerability in this plugin, please disclose it responsibly. Follow the protocols on the Themeisle Security Page.